
To create new calendar event, click New>Calendar Event on the menu.
Calendars can be displayed in Day, 5 day week, 7 day week, Month and Quarter views. To put a calendar event into one of these views, or to edit an existing event, use the calendar event editor show below. Clicking or double-clicking on a calendar event will open the editor:
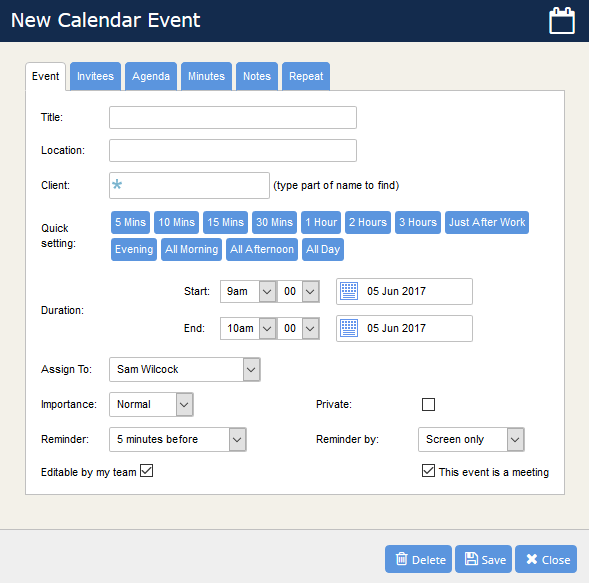
The editor has a number of tabs – some of which are only displayed when the box “This event is a meeting” has been checked.
To create a new calendar event:
-
- Give the event a title and a location, then, if appropriate select a client using the standard selector in HQ (just start typing part of the name of a Person or Business and a list of possible contenders will appear).
- The start and end times for the event can be set manually or use the duration picker to set the end time for 5, 10, 15, 30, 60, 120 or 180 minutes after the start.
- Alternatively, on the duration picker, a single click on “Just After Work”, “Evening”, “All Morning”, “All Afternoon” or “All Day” will setup times as follows:
-
Just After Work Start: 6:00 PM End: 7:30 PM Intended for a brief “after work” meeting Evening Start: 7:30 PM End: 11:00 PM All Morning Start: 9:00 AM End: 12:30 All Afternoon Start: 1:00 PM End: 5:00 PM All Day Start: 9:00 AM End: 5:00 PM - By default, new calendar events are assigned to the currently logged-in person. You can re-assign an event by changing the “Assign To” drop-down. Calendar events that have been assigned will not appear in your calendar but rather in the calendar of the assignee.
- By default, new calendar events are set to importance level “Normal”. This can be changed here to “Provisional”, “Normal”, “High” or “Critical”.
- Any calendar event can be declared as “Private”. In this case the event will appear in all relevant calendars but, if it is show to anybody else, will simply say “Private” as the title of the event.
- Reminders for a calendar event can be set for a few minutes (up to 1 day) to trigger before the event. The reminder method can be set to be by pop-up on the screen, by text message (SMS) or by email.
- The event can be made editable by your team – in which case any team member can change any detail of your event, or, by un-checking the box, it will only be editable by you.
- If the event is set as a meeting (by checking the “This event is a meeting” checkbox) the extra tabs appear to allow the meeting to have Invitees and an Agenda before the meeting and Minutes after the meeting.
To add Notes to a calendar event, enter your notes on the Notes tab:

Notes that appear on a calendar event will be indexed into HQ’s database and can be a useful way of finding an old event.
To repeat a calendar event, click a series of dates on the Repeat tab:

As you click new dates, they will appear on the right hand side of the calendar. To remove one of the dates, simply click the X next to the date in question.
Please note: the repeated dates are used at the time of creating the event. After repeat events are created they become separate events and each one can be edited independently.
Meetings
If an event has been set as a meeting in HQ, then the tabs “Invitees”, “Agenda” and “Minutes” appear. These are used for storing the additional information that defines a meeting and ensuring that the event appears in the right calendars.
For example, the Invitees page allows you to add the Invitees to the meeting – both the internal and external invitees. For the internal invitees than the meeting will appear in their calendars. For the external invitees you have the opportunity to send them an agenda (and, after the meeting, the minutes).

To invite any of your team members to your meeting, simply click the relevant checkboxes in the “internal Invitees” section.
Add external invitees, use the standard HQ selector (just type part of a name of a Person or a Business and select from the list that appears).
To create an Agenda for a meeting, use the Agenda tab:
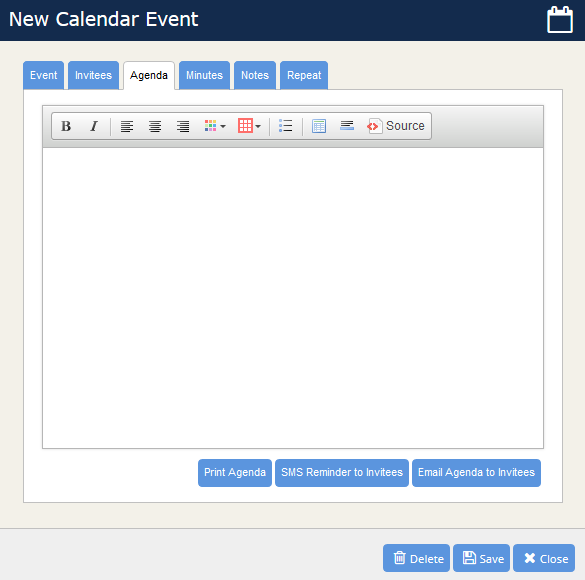
You can create the agenda using any of the formatting tools on the tool bar and the text for the agenda will be indexed by HQ for subsequent searches.
The Agenda can be printed, sent by text message (SMS messages need to be kept to below 160 characters) or emailed to all invitees. Simply click the relevant button to start any of these processes.
To enter the Minutes for a meeting, simply click on the Minutes tab:

You can create the minutes using any of the formatting tools on the tool bar and the text for the minutes will be indexed by HQ for subsequent searches.
The minutes can be printed or emailed to all invitees. Simply click the relevant button to start one of these processes.
For information on how to use the HQ calendar please click the following link – Working with the HQ Calendar.