
Inbox
You can view you inbox by either:
- Click the Inbox button on the top menu
![]()
- Or select Email > Inbox from the main menu.
- Or select View > Inbox from the main menu.
HINT: To simplify access to you inbox even further you can set the inbox to be your start-up page, by going to Tools > Options.
A typical inbox view is as follows:
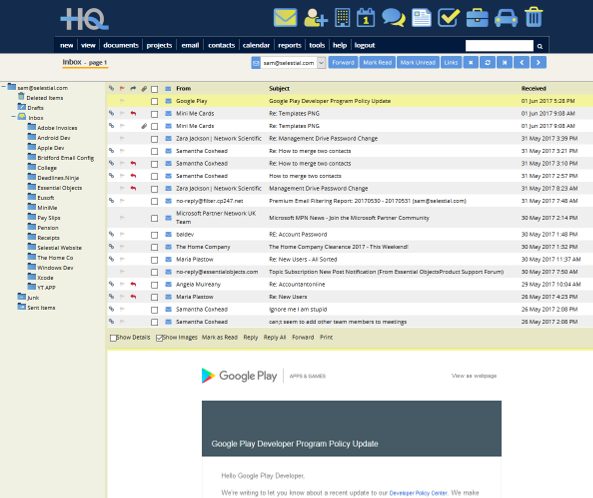
The Inbox Window has three sections (that we call Panes). These are:
- Folder Tree – into which emails can be filed.
- Email List – which is a list of the emails inside the selected folder (this defaults to the Inbox folder itself)
- Preview Pane – this provides quick access to any email in your email list. Simply click any of the ‘white space’ around any email in your list and it will be previewed in the Pane.
These three panes can be freely resized by dragging their borders. Once resized, the new positions of the panes will be remembered on your computer.
Folder Tree
The folder tree provides a convenient mechanism to file emails. It has a number of features that help this process and these can be accessed from the right-mouse-click or ‘context’ menu. Typically this menu looks as follows:

The folder tree can contain any number of folders and sub-folders. To create a new folder, right mouse click on an existing folder and choose “Add sub-folder”.
- To open a folder, select Open Folder or left-mouse click on the folder itself.
- To rename a folder, click rename folder and provide a new name in the pop-up dialog box.
- To delete a folder, click delete folder. Only empty folders can be deleted.
Folders can be associated with Businesses, People and/or Jobbags. This association is established using a special type of folder known as a ‘Smart Folder’. These are clearly visible in a folder tree as they have a red star icon in the middle of the folder.
Smart Folders are extremely helpful shortcuts. By filing an email into a Smart Folder two or more operations are performed automatically. Firstly the email itself is filed and secondly it is linked directly to the Businesses, People and/or Jobbags linked to the Smart Folder. Emails that have been linked can then be found in the history or all the associated items. For example if we have a simple Smart Folder that is linked to a Business called ‘Selestial’, then any email in that folder will also be linked to ‘Selestial’ and when I explore the history of ‘Selestial’ I will find this email.
To create a Smart Folder, select Smart Folder from the context menu and complete the ‘Links’ dialog box that appears:

To create links for a Smart Folder, type in all or part of the name of a Person, a Business or a Jobbag.
This illustration show the Business and Jobbags found by typing-in part of the word ‘Selestial’. Note that only part of the word is required and that the search is case-insensitive.
- To Select an item to link to you can either click on the name of the item or click on the right arrow
- To remove an item from the selection, click the X button
- To save the selection click the Save Links button.
This linking process can be used to either create a new Smart Folder, to edit the links on an existing Smart Folder or to remove all links – thus converting the Smart Folder back to a normal folder.
Once folders and Smart Folders have been created, any of the following operations is possible:
- To move an email into a folder, simply drag the email icon
- To move multiple emails into a folder, click the check boxes next to the emails in question and drag one of their email icons into the chosen folder.
- To delete an email, you can either drag the email icon to the waste bin in the top right hand corner on the top menu bar or you can select that email by clicking the check box and then pressing the delete button at the top of the email list.
- To delete multiple emails, you can do the same as deleting a single one but select multiple ones by clicking their check boxes.
- To move folders, drag the folder icon to the chosen new location in the folder tree.
Email List
By default, the email list shows the 20 most recent emails in your inbox.

Here is an image of the top three items in a typical email list. As you can see the list is split into several columns these are:
Links: The presence of this icon indicates that this email has been linked to either a Person, Business and/or a Jobbag. You can click the icon to view or edit the links.
Flag: This icon is shown whenever an email has been marked for follow-up. To mark an email for follow-up simply click the grayed-out version of this icon. To un-mark it, click on the red icon.
Attachment: This icon is show when an email has one or more attachments.
![]() This check box can either be used to select all the emails in the list at once if you click the check box at the top of the list in the header of the email list, or it can be used to select individual emails by click the check box for single emails in the list.
This check box can either be used to select all the emails in the list at once if you click the check box at the top of the list in the header of the email list, or it can be used to select individual emails by click the check box for single emails in the list.
Read/Unread: This icon will be blue for read and yellow for unread
From: The name of the person who sent you the email (this become the name you sent the email To when you are looking at you Sent Items list.
Click this title to sort your Inbox by sender.
Subject: The subject of the email.
Click this title to sort your Inbox by subject.
Received: The date and time at which this email was received.
Click this title to sort by received date and time (this is the default sort order)
Sorting & Filtering Email
Using the headers in the email list, you can sort or filter the emails. For example, if your click on the Links title then the email list toggles between showing all of your emails, to only those emails that are linked. This is equivalent to viewing the emails of your known contacts, effectively prioritising your emails that are from customers or contacts.
When a filter is applied, the icon in the header is highlighted. To remove the filter, simply click on the filter again.
The full list of filter options are as follows
Links: Shows emails that are linked, showing only your clients and contacts emails.
Flag: This icon is shown whenever an email has been marked for follow-up. To view only flagged emails click on this icon in the header bar.
Read/Unread: You can show only unread emails by clicking the icon in the header of the email list.
From: Click this title to sort your Inbox by sender. This is not really useful if you have a large folder, it is always better to view a contacts history page to filter by sender.
Subject: Click this title to sort your Inbox by subject. This is not really useful if you have a large folder; it is better to view a contact’s history page or to use the search facility to find
Received: The date and time at which this email was received. Click this title to sort by received date and time (this is the default sort order)
Preview Pane
The Preview Pane shows a preview of any one of the emails in your Email List. To show a preview in the preview bar, click on any of the white-space around any of the emails in your Email List. A preview will be created and the email will change background colour to indicate which one has been previewed.
The Preview Pane is separated from the Email List by a bar called the Preview Bar:
![]()
The preview bar can be dragged up and down to resize the preview pane. It also contains a number of controls that apply to the previewed email. These are:
- Show Details:
- Click this check box to show (or to hide) details of the email. These details are the From addresses, To addresses, CC addresses, Date and Time the email was received, the Subject of the email and a list of attachments.
- Show Images:
- Click this box to show (or hide) the images in the previewed email. By default this check box is un-checked and images are not displayed.
Only show images for emails where you trust the source of the email.
- Click this box to show (or hide) the images in the previewed email. By default this check box is un-checked and images are not displayed.
- Mark as Read:
- Click this link to indicate that you have read the email
- Mark as Unread:
- Click this link to change its status to unread.
- Reply:
- This creates a new email in a new window that is addressed to the sender of the previewed email.
- Reply All:
- This creates a new email in a new window that is addressed to the sender and all other recipients of the previewed email.
- Forward:
- Click this link to create a new email where the previewed email is attached and a standard email attachment.
- Print:
- Show a new window in which a print-ready version of the email is display. In this new window, your email will have been converted to a PDF and can be accurately printed or save locally.